homemade quail plucker
Nov . 04, 2024 23:54 Back to list
homemade quail plucker
Homemade Quail Plucker A Step-by-Step Guide
Quail hunting has become a popular pastime for many outdoor enthusiasts and culinary aficionados. While the thrill of the hunt is exhilarating, the challenge of preparing these delicate birds for the table can often be daunting, particularly when it comes to plucking the feathers. Traditional plucking can be tedious and time-consuming. Fortunately, creating a homemade quail plucker can simplify the process and save you time. In this article, we will guide you through the steps to create your own efficient quail plucker.
Understanding the Basics of a Quail Plucker
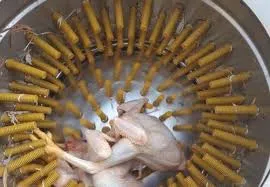
A quail plucker is a device designed to quickly remove feathers from quail, helping to streamline the processing of these small birds. The key components of a quail plucker generally include a motor, rubber fingers or slots that assist in pulling out the feathers, and a container to hold the birds while they are being plucked. Building your own plucker not only saves money but allows you to customize it to your specific needs.
Materials Needed
To construct a homemade quail plucker, gather the following materials
1. Power Drill or Electric Motor A motor with sufficient RPM (revolutions per minute) to power the plucking mechanism is essential. 2. Rubber Fingers These can be purchased or made from flexible rubber tubing. They should be approximately 4 inches long and about half an inch wide, providing the necessary grip to remove feathers without damaging the skin. 3. Wooden Base and Housing Using plywood, create a sturdy base and housing for your plucker. This ensures stability during operation. 4. Container A bucket or tub to catch the plucked feathers and hold the quail during the plucking process. 5. Screws and Fasteners To assemble the wooden components and secure the motor. 6. Tools A drill, saw, and screwdriver will be necessary for assembling the parts.
Step-by-Step Construction
1. Prepare the Base Cut a piece of plywood into a square or rectangular shape. This will be the foundation of your plucker. Ensure it is sturdy enough to support the weight of the motor and the quail.
homemade quail plucker

2. Mount the Motor Secure the electric motor to one end of the wooden base using screws and brackets. Ensure that it is firmly in place, as it will be subjected to vibrations during operation.
3. Create a Plucking Mechanism Attach a circular disc to the motor shaft. This disc will serve as the platform for the rubber fingers. Spacing the rubber fingers evenly around the perimeter will allow them to hit the quail evenly as it rotates.
4. Attach Rubber Fingers Drill holes into the circular disc and insert the rubber fingers. Ensure they are tightly secured so that they do not come loose during operation. The rubber should be flexible enough to allow for feather removal while protecting the skin.
5. Construct a Housing Build a wooden enclosure around the motor and the plucking mechanism. This is essential for safety, preventing the operator from accidentally coming into contact with moving parts.
6. Add a Container Position a bucket or tub beneath the rotating disk to catch the feathers and hold the quail. This part is crucial for ease of clean-up after plucking.
Operating Your Homemade Quail Plucker
Once your quail plucker is assembled, it’s time for its first test. Before inserting a quail, plug in the motor and let it run for a few seconds to ensure everything is functioning correctly. Once satisfied, gently place a prepared quail onto the spinning rubber fingers and observe the feathers being removed in seconds.
Conclusion
Creating a homemade quail plucker is a rewarding project that can significantly reduce the time and effort required to process quail. With a little DIY spirit and some basic materials, you can build a modified version suited to your specific needs, pushing your outdoor and culinary experiences to new heights. Happy hunting and happy plucking!
-
Automatic Feeding Line System - Anping County Yize Metal Products Co., Ltd.|Pan Feeder Nipple Drinker,Broiler Farming
NewsJul.30,2025
-
Automatic Feeding Line System Pan Feeder Nipple Drinker-Anping County Yize Metal Products Co., Ltd.
NewsJul.30,2025
-
Automatic Feeding Line System-Anping County Yize Metal Products Co., Ltd.|Durable Construction&Easy Maintenance
NewsJul.30,2025
-
Automatic Feeding Line System-Anping County Yize Metal Products Co., Ltd.|Pan Feeder Nipple Drinker&Durable Poultry Farming Solution
NewsJul.30,2025
-
Automatic Feeding Line System Pan Feeder Nipple Drinker|Anping County Yize Metal Products Co., Ltd.
NewsJul.29,2025
-
Automatic Feeding Line System-Pan Feeder Nipple Drinker|Anping County Yize Metal Products Co., Ltd.
NewsJul.29,2025


